使用VS创建一个C#类库
写一个简单的int类型整数相加函数

调试生成TestDll.dll,然后新建一个C++的Win32控制台项目,直接生成解决方案,然后将C#生成的 TestDll.dll 放到C++项目目录中,并使用#using引用C#编写的DLL文件,使用using使用C#中你要使用的类所在的命名空间,然后使用C#中的类名生成一个对象并调用你要使用的函数,如下代码所示。

在编译之前应该右键项目名称->属性->配置属性->常规

将公共语言运行时支持从无公共语言运行时支持设置成公共语言运行时支持(/clr).

C++/CLI中使用gcnew关键字表示在托管堆上分配内存,并且为了与以前的指针区分,用^来替换* ,就语义上来说他们的区别大致如下:

1. gcnew返回的是一个句柄(Handle),而new返回的是实际的内存地址.

2. gcnew创建的对象由虚拟机托管,而new创建的对象必须自己来管理和释放.

#include "stdafx.h"
#include<windows.h>
#using "../Debug/TestDll.dll"
using namespace TestDll;
int _tmain(int argc, _TCHAR* argv[])
{
	int sum,x,y;
	x = 10;
	y = 20;
	Class1 ^a = gcnew Class1();
	sum = a->demoAdd(x ,y);
	printf("%d+%d=%d\n",x,y,sum);
	system("pause");
	return 0;
}
成功!

HMAC: Hash-based Message Authentication Code,即基于Hash的消息鉴别码

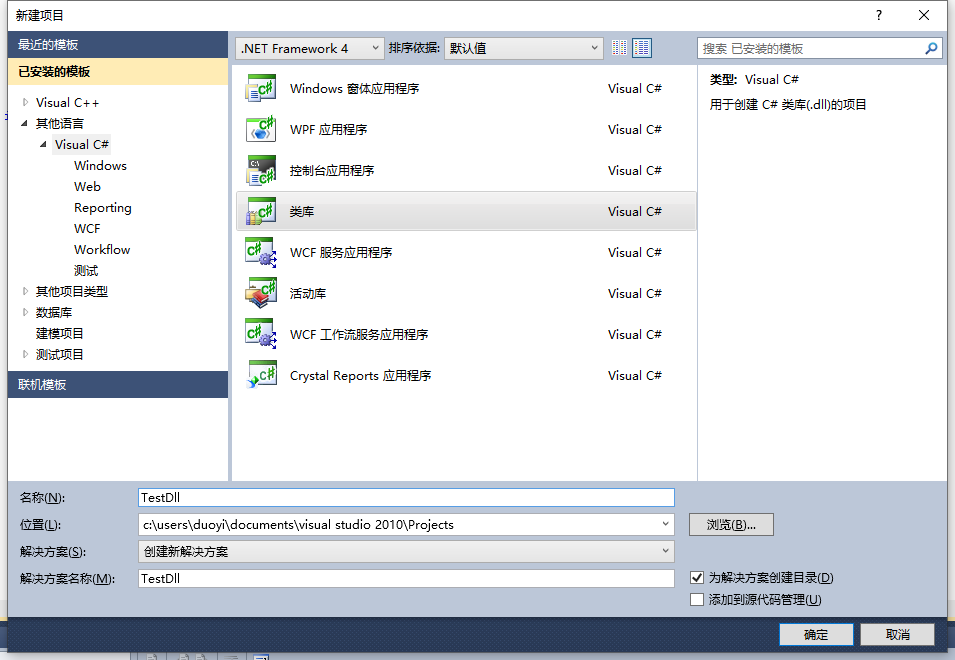
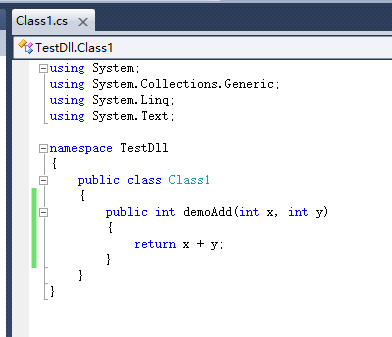
这周开始将图片上传、图片下载迁移到OSS上,在调用OSS的时候需要根据规则使用Hmac Sha1+BASE64对图片的一些数据进行计算token再上传,遇到了一个困扰一周的坑。

在生成token的规则中要求将sign_str加上一个换行符(\n)再进行Hmac Sha1计算,给的Python Demo如下:

sign_str = “{}?{}\n”.format( req_path , query_str )
b64_enc_sign_str = hash_hmac (sign_str , secret_key)

然后我直接在C++项目中

#include<openssl/hmac.h>

HMAC (EVP_sha1() , ch , strlen(ch) , data , dataLength , digest , &digest_len);

其中data是一个unsigned char*类型的数据,由字符串转化而来,而字符串的末尾加上了换行符,发现相同的加密串,相同的密钥,使用openssl中的Hmac和Python demo中的计算结果截然不同,然而都不加换行符的话计算结果则一模一样。

最后通过github寻找现成的Hmac_Sha1加密算法才得以解决。

#include <iostream>
#include <string>
#include <cmath>
#include <cstdio>
using namespace std;
unsigned long Rol(unsigned long x, int y);
unsigned long Ror(unsigned long x, int y);
unsigned long f(unsigned long B,unsigned long C,unsigned long D, int t);

unsigned long H[5];
unsigned long T[512]={0};
void HMAC(string text, string key);
void SHA1(string s);
// HMAC function
int i;
void HMAC(string text, string key)
{
	char c;
	string s;
	unsigned long Key[16] = {0};
	unsigned long X[16] = {0};
	unsigned long Y[16] = {0};
	unsigned long ipad = 0x36363636;
	unsigned long opad = 0x5c5c5c5c;
	int k;
	s = "";

	//Process string key into sub-key
	//Hash key in case it is less than 64 bytes
	if (key.length() > 64)
	{
		SHA1(key);
		Key[0] = H[0];
		Key[1] = H[1];
		Key[2] = H[2];
		Key[3] = H[3];
		Key[4] = H[4];
	}
	else
	{
		for(int i=0; i<16; i++)
		{
			for(int j=0; j<4; j++)
			{
				if (4*i+j <= key.length())
				{
					k = key[4*i+j];
				}
				else
				{
					k = 0;
				}
				if (k<0)
				{
					k = k + 256;
				}
				Key[i]= Key[i] + k*pow(256,(double)3-j);
			}
		}
	}

	for(int i=0; i<16; i++)
	{
		X[i] = Key[i]^ipad;
		Y[i] = Key[i]^opad;
	}

	//Turn X-Array into a String
	for(i=0; i<16; i++)
	{
		for(int j=0; j<4; j++)
		{
			c = ((X[i] >> 8*(3-j)) % 256);
			s = s + c;
		}
	}

	//Append text to string
	s = s + text;

	//Hash X-Array
	SHA1(s);

	s = "";

	//Turn Y-Array into a String
	for(i=0; i<16; i++)
	{
		for(int j=0; j<4; j++)
		{
			c = ((Y[i] >> 8*(3-j)) % 256);
			s = s + c;
		}
	}

	//Append Hashed X-Array to Y-Array in string
	for(i=0; i<5; i++)
	{
		for(int j=0; j<4; j++)
		{
			c = ((H[i] >> 8*(3-j)) % 256);
			s = s + c;
		}
	}

	//Hash final concatenated string
	SHA1(s);

}

// SHA-1 Algorithm
void SHA1(string s)
{
	unsigned long K[80];
	unsigned long A,B,C,D,E,TEMP;
	int r,k,ln;
	H[0]=0x67452301;
	H[1]=0xefcdab89;
	H[2]=0x98badcfe;
	H[3]=0x10325476;
	H[4]=0xc3d2e1f0;

	ln=s.length();
	r = int((ln+1)/64);

	if (((ln+1) % 64) > 56)
		{
		r=r+1;
		}

	// initialize Constants
	for(int t=0; t<80; t++)
		{
			if (t<20)
				{
					K[t] = 0x5a827999;
				}

			if ((t>19)&(t<40))
				{
					K[t] = 0x6ED9EBA1;
				}
			if ((t>39)&(t<60))
				{
					K[t] = 0x8F1BBCDC;
				}
			if (t>59)
				{
					K[t] = 0xca62c1d6;
				}
		}

	for(int l=0; l <= r; l++)
	{
		unsigned long W[80]={0};
		//Initialize Text
		for (int i=0; i<16; i++)
			{
			for(int j=0; j<4; j++)
				{
					if (4*i+j <= ln)
					{
						k = s[64*l+4*i+j];
					}
					else
					{
						k = 0;
					}

					if (k<0)
					{
						k = k +256;
					}

					if (4*i+j == ln)
					{
						k = 0x80;
					}

					W[i]= W[i] + k*pow(256,(double)3-j);
				}
			}
		if ((W[14]==0)&(W[15]==0))
		{
			W[15]=8*s.length();
		}

	// Hash Cycle

		for (int t = 16; t <80; t++)
			{
				W[t] = Rol(W[t-3]^W[t-8]^W[t-14]^W[t-16],1);
			}

		A = H[0];
		B = H[1];
		C = H[2];
		D = H[3];
		E = H[4];

		for(int t = 0; t < 80; t++)
		{
			TEMP = Rol(A,5) + f(B,C,D,t) + E + W[t] + K[t];
			E = D;
			D = C;
			C = Rol(B,30);
			B = A;
			A = TEMP;
		}

		H[0] = H[0] + A;
		H[1] = H[1] + B;
		H[2] = H[2] + C;
		H[3] = H[3] + D;
		H[4] = H[4] + E;

		ln = ln - 64;
	}

}

unsigned long f(unsigned long B,unsigned long C,unsigned long D, int t)
{
	if (t < 20)
		{
			return ((B & C)^((~B) & D));
		}
	if ((t > 19) & (t < 40))
		{
			return (B ^ C ^ D);
		}
	if ((t > 39) & (t < 60))
		{
			return ((B & C)^(B & D)^(C & D));
		}
	if (t > 59)
		{
			return (B ^ C ^ D);
		}
}


unsigned long Rol(unsigned long x, int y)
{
	if (y % 32 == 0) {return x;}
	else {return ((x << y)^(x >> -y));}
}

unsigned long Ror(unsigned long x, int y)
{
	if (y % 32 == 0) {return x;}
	else {return ((x >> y)^(x << -y));}
}
int main()
{
	HMAC("helloworld\n","q4mJAS777BUbbdVpEqh2XRcZZqNyDweU4GRnM690");
	int i = 0;
	for(i = 0;i < 5;i++)
	{
		printf("%.8X\n",H[i]);
	}
}

然后以为这一关就过了。。。然后在进行Base64加密的时候又遇到了一个坑。

给出的Python demo的代码如下:

b64_enc_sign_str = base64.b64encode( hmac_code ).decode()

然后我使用常规的Base64算法进行计算,又发现两个相同的字符串进行加密后得到的结果大相径庭。

最后在 https://1024tools.com/hmac 找到了原因,常规的Base64算法就像 https://blog.csdn.net/wo541075754/article/details/81734770 所说,而我们这里需要将HMAC计算返回的原始二进制数据后进行Base64编码。

首先将HMAC_Sha1加密得出的结果转换为二进制编码。

void CCommonFunction::HexToBin(CString hexDight , CString& binDight){
	binDight = "";
	int f = 0,c = 0;
	char e;
	for(int f = 0; f <= hexDight.GetLength() ; f++){
		e = hexDight[f];
		if(e >= 'a' && e <= 'f'){
			int a = static_cast<int>(e-'a'+10);
			switch(a){
				case 10 : binDight = binDight + "1010";
					break;
				case 11 : binDight = binDight + "1011";
					break;
				case 12 : binDight = binDight + "1100";
					break;
				case 13 : binDight = binDight + "1101";
					break;
				case 14 : binDight = binDight + "1110";
					break;
				case 15 : binDight = binDight + "1111";
					break;
			}
		}
		else if( e >= '0' && e <= '9'){
			int b = static_cast<int>(e-'0');
			if(f == 0){
			switch(b){
				case 0: 
					break;
				case 1: binDight = binDight + "1";
					break;
				case 2: binDight = binDight + "10";
					break;
				case 3: binDight = binDight + "11";
					break;
				case 4: binDight = binDight + "100";
					break;
				case 5: binDight = binDight + "101";
					break;
				case 6: binDight = binDight + "110";
					break;
				case 7: binDight = binDight + "111";
					break;
				case 8: binDight = binDight + "1000";
					break;
				case 9: binDight = binDight + "1001";
					break;		
			}
			}
			else{
				switch(b){
				case 0 : binDight = binDight + "0000";
						 break;
				case 1: binDight = binDight + "0001";
					break;
				case 2: binDight = binDight + "0010";
					break;
				case 3: binDight = binDight + "0011";
					break;
				case 4: binDight = binDight + "0100";
					break;
				case 5: binDight = binDight + "0101";
					break;
				case 6: binDight = binDight + "0110";
					break;
				case 7: binDight = binDight + "0111";
					break;
				case 8: binDight = binDight + "1000";
					break;
				case 9: binDight = binDight + "1001";
					break;		
				}
			}
		}
	}
}

然后判断二进制串是否是6的倍数,不是6的倍数的话在末尾补0直到该二进制串是6的倍数,然后每6位取一次6位的二进制串,转换为10进制,然后去Base64编码对照表中找出这个十进制数字对应的字符,将这些所有的字符拼接起来并在末尾加上一个固定的“=”即可,代码如下:

//Base64编码表
const  char Base64EncodeMap[64] =
{
	'A', 'B', 'C', 'D', 'E', 'F', 'G', 'H',
	'I', 'J', 'K', 'L', 'M', 'N', 'O', 'P',
	'Q', 'R', 'S', 'T', 'U', 'V', 'W', 'X',
	'Y', 'Z', 'a', 'b', 'c', 'd', 'e', 'f',
	'g', 'h', 'i', 'j', 'k', 'l', 'm', 'n',
	'o', 'p', 'q', 'r', 's', 't', 'u', 'v',
	'w', 'x', 'y', 'z', '0', '1', '2', '3',
	'4', '5', '6', '7', '8', '9', '+', '/'
};

void CCommonFunction::BinToBase64(CString binStr , CString &base64Str)
{
	while(binStr.GetLength() % 6 != 0){
		binStr = binStr + "0";
	}
	base64Str = "";
	CString tmp = "";
	int index = 0;
	int num = 0;
	while(index < binStr.GetLength()){
		tmp = binStr.Mid(index , 6);
		index = index + 6;
		num = BinToDecInt(tmp);
		base64Str = base64Str + Base64EncodeMap[num];
	}
	base64Str = base64Str + "=";
}

Windows下使用std::wifstream读取Unicode文本的方法:

std::locale loc("chs");				//windows下ok
	std::wcout.imbue(loc);
	// open as a byte stream
	std::wifstream wif("路径", std::ios::binary);
	std::codecvt_utf16<wchar_t, 0x10ffff, std::consume_header>* codecvtToUnicode = new std::codecvt_utf16 < wchar_t, 0x10ffff, std::consume_header >;
	if (wif.is_open())
	{
		// apply BOM-sensitive UTF-16 facet
		wif.imbue(std::locale(wif.getloc(), codecvtToUnicode));
		std::wstring wline;
		while (std::getline(wif, wline))
		{
			std::wstring convert;
			for (auto c : wline)
			{
				if (c != L'\0' && c != L'?')
					convert += c;
			}
			wcout << convert << endl;
		}
		wif.close();
		//delete codecvtToUnicode;     //new和delete,应该不用手动delete,在哪里delete都会崩溃(亲测)
	}


Windows下使用std::wifstream读取UTF-8文本的方法:

std::locale loc("chs");				//windows下ok
	std::wcout.imbue(loc);
	// open as a byte stream
	std::wifstream wif("路径", std::ios::binary);
	std::codecvt_utf8<wchar_t, 0x10ffff, std::consume_header>* codecvtToUnicode = new std::codecvt_utf8 < wchar_t, 0x10ffff, std::consume_header >;
	if (wif.is_open())
	{
		// apply BOM-sensitive UTF-8 facet
		wif.imbue(std::locale(wif.getloc(), codecvtToUnicode));
		std::wstring wline;
		while (std::getline(wif, wline))
		{
			std::wstring convert;
			for (auto c : wline)
			{
				if (c != L'\0' && c != L'?')
					convert += c;
			}
			wcout << convert << endl;
		}
		wif.close();
		//delete codecvtToUnicode;     //new和delete,应该不用手动delete,在哪里delete都会崩溃(亲测)
	}


在完成搜索工具项目的时候,给DuiLib的一个窗口ResizeClient的时候编辑框会失去焦点,我们将焦点想办法重新给到编辑框后,发现光标的位置总是会默认在最前面的位置,这大大的影响了程序的用户体验,通过查看DuiLib源码发现只有SetSel函数而没有GetSel函数,于是通过修改源码实现了一个。

通过查看SetSel的源码我们可以看到如下代码:

void CEditUI::SetSel(long nStartChar, long nEndChar)
{
	if( m_pWindow != NULL ) Edit_SetSel(*m_pWindow, nStartChar,nEndChar);
}

接着查看Edit_SetSel的源码如下:

#define Edit_SetSel(hwndCtl, ichStart, ichEnd)  ((void)SNDMSG((hwndCtl), EM_SETSEL, (ichStart), (ichEnd)))

接着查看SNDMSG的源码如下:

#define SNDMSG :: SendMessage

原来是通过发消息来实现的。

同时Edit_SetSel的上面一行代码就是:

#define Edit_GetSel(hwndCtl)                    ((DWORD)SNDMSG((hwndCtl), EM_GETSEL, 0L, 0L))

通过查询微软文档:EM_GETSEL消息

我们可以知道:返回值是一个从零开始的值,其中光标的起始位置在LOWORD中,而光标末尾的位置在HIWORD中。

所以我们可以完成我们的GetSel了。

WORD CEditUI::GetSel(){
      if(m_pWindow != NULL)
      return LOWORD(Edit_GetSel(*m_pWindow));
}

如果只是为了获得光标位置,这里使用LOWORD和HIWORD得到的值是相同的。

SQLite官方下载页只提供SQLite3.def和SQlite3.dll文件的下载,若使用VC++编程的话,还需要SQLite3.lib库文件,才能调用编译成功。我们可以使用 Visual C++ 提供的 X:\Program Files\Microsoft Visual Studio 11.0\VC\bin\lib.exe 程序生成 SQLite3.lib 库文件。

官方下载地址:http://www.sqlite.org/download.html

一、下载 SQLite3.def和SQlite3.dll 文件,并解压到如 D:\SQLite3\ 目录下。

二、运行 CMD, 输入:
"D:\Program Files (x86)\Microsoft Visual Studio 14.0\VC\bin\lib.exe" /MACHINE:IX86 /DEF:D:\SQLite3\SQLite3.def /OUT:D:\SQLite3\SQLite3.lib
如下图所示:

三、回车后,成功生成 SQLite3.lib 和 SQLite3.exp 两个文件。如下图所示:

VS2015中配置使用SQLite3

下载SQLite源文件

  1. 新建Win32空项目。
  2. 项目属性
    a) 添加包含目录,即刚才下载解压后sqlite3.h所在路径。
    b) 添加库目录,即添加SQLite3.lib所在文件路径。

c) 链接器-输入-附加依赖项,输入SQLite3.lib。

注:SQLite3路径下文件如下图:

3.添加源文件,输入如下:

#include <stdio.h>
#include "sqlite3.h"

int main(int argc, char* argv[])
{
    sqlite3 *db;
    char *zErrMsg = 0;
    int rc;

    rc = sqlite3_open("test.db", &db);

    if (rc) {
        fprintf(stderr, "Can't open database: %s\n", sqlite3_errmsg(db));

    }
    else {
        fprintf(stderr, "Opened database successfully\n");
    }
    sqlite3_close(db);

    return 0;
}

编译,不报错的话即环境配置正确。

今天在根据文件名的拓展名进行文件分类的时候,发现文件的拓展名是不区分大小写的,所以要根据拓展名进行简单分类的话,就需要一个string不区分大小写查找的方法。

size_t FindNoCase(string strSource, char* szTarget)
{
if(strSource.empty())
{
return string::npos;
}
string strSub = szTarget;
if (strSub.empty())
{
return string::npos;
}
for (string::iterator it = strSource.begin(); it != strSource.end(); ++it)
{
*it = tolower(*it);
}
for (string::iterator ite = strSub.begin(); ite != strSub.end(); ++ite)
{
*ite=tolower(*ite);//do not change szTarget context.
}
return strSource.find(strSub);
}


在C++中,system函数可以运行命令行,但是只能得到该命令行的int型返回值,并不能获得显示结果。例如system(“ls”)只能得到0或非0,如果要获得ls的执行结果,则要通过管道来完成的。首先用_popen(Linux下函数名为popen)打开一个命令行的管道,然后通过fgets获得该管道传输的内容,也就是命令行运行的结果。

VS2013下代码如下:

#include "stdafx.h"
#include<windows.h>
#include<string>
#include<iostream>
using namespace std;

std::string getCMD(char * cmd){
	FILE *file;
	char ptr[1024] = { 0 };
	char tmp[1024] = { 0 };
	strcat_s(ptr, cmd);
	string result = "";
	if ((file = _popen(ptr, "r")) != NULL)
	{
		while (fgets(tmp, 1024, file) != NULL){
			result = result + tmp;
		}
		_pclose(file);
	}
	return result;
}

int _tmain(int argc, _TCHAR* argv[])
{
	cout << getCMD("ping www.maplefan.com");
	system("pause");
}


上列代码在执行诸如ping命令这种需要等待的命令行的时候,会知道ping指令完全结束才一次输出信息。

如果想要像ping命令一样即时输出的话,可以在while循环里想办法输出即可。

CLabelUI等控件可以实现高亮,实现方法如下:

(1)将该控件的SetShowHtml()设置为true,即使用html的方式进行解析。

(2)在字符中加入下列想要的格式即可。让它自己去解析,完成绘制。


//   Bold:             <b>text</b>
//   Color:            <c #xxxxxx>text</c>  where x = RGB in hex
//   Font:             <f x>text</f>        where x = font id
//   Italic:           <i>text</i>
//   Image:            <i x y z>            where x = image name and y = imagelist num and z(optional) = imagelist id
//   Link:             <a x>text</a>        where x(optional) = link content, normal like app:notepad or http:www.xxx.com
//   NewLine           <n>
//   Paragraph:        <p x>text</p>        where x = extra pixels indent in p
//   Raw Text:         <r>text</r>
//   Selected:         <s>text</s>
//   Underline:        <u>text</u>
//   X Indent:         <x i>                where i = hor indent in pixels
//   Y Indent:         <y i>                where i = ver indent in pixels

按照上述样式,可进行绘制操作。

比如构造一个字符串设置颜色:

<c #ff00ff>test</c>

构造成类似这种字符串,控件会自动以HTML格式解析绘制。

最近Win32编程被编码折磨得很惨。。。记录一下两个转化函数。

wchar_t*转std::string:

std::string wchar_tToString(wchar_t *wchar){
	std::string szDst;
	wchar_t* wText = wchar;
	DWORD dwNum = WideCharToMultiByte(CP_OEMCP, NULL, wText, -1, NULL, 0, NULL, FALSE);
	char *psText;
	psText = new char[dwNum];
	WideCharToMultiByte(CP_OEMCP, NULL, wText, -1, psText, dwNum, NULL, FALSE);
	szDst = psText;
	delete[]psText;
	return szDst;
}

std::string转wchar_t*:

wchar_t* stringToWchar_t( std::string str){
	std::string temp = str;
	int len = MultiByteToWideChar(CP_ACP, 0, (LPCSTR)temp.c_str(), -1, NULL, 0);
	wchar_t *wszUtf8 = new wchar_t[len + 1];
	memset(wszUtf8, 0, len * 2 + 2);
	MultiByteToWideChar(CP_ACP , 0 , (LPCSTR)temp.c_str() , -1 , (LPWSTR)wszUtf8 , len);
	return wszUtf8;
}


最近的文件搜索项目使用到了SQLite3作为数据库来缓存本地的文件,而通过USN读取到NTFS盘上的文件(开发机器上大概40w个文件/文件夹)在Intel Core i7-6700上大概就需要7s左右的时间,而通过常规的SQLite提供的C++ API 将文件的这些信息插入到数据库的表中,大概需要30s的时间,于是开始摸索是否有办法可以提高插入的效率进而减少我们程序的后台文件搜索耗时线程所花费的时间。

慢速:直接使用SQLite的C++ API

int sqlite3_exec(  sqlite3*,    const char *sql,   int (*callback)(void*,int,char**,char**),   void *,   char **errmsg)

中速:显式开启事务

所谓”事务“就是指一组SQL命令,这些命令要么一起执行,要么都不被执行。在SQLite中,每调用一次sqlite3_exec()函数,就会隐式地开启了一个事务,如果插入一条数据,就调用该函数一次,事务就会被反复地开启、关闭,会增大IO量。如果在插入数据前显式开启事务,插入后再一起提交,则会大大提高IO效率,进而加数据快插入速度。

开启事务只需在上述代码的前后各加一句开启与提交事务的命令即可:

开启事务:

sqlite3_exec(db,"begin;",0,0,0);

提交事务:

sqlite3_exec(db,"commit;",0,0,0);

高速:关闭写同步(synchronous)

之前的速度仍然不能够接受,在有关讲解SQLite配置的资料中,看到了“写同步”选项。

在SQLite中,数据库配置的参数都由编译指示(pragma)来实现的,而其中synchronous选项有三种可选状态,分别是full、normal、off。这篇博客以及官方文档里面有详细讲到这三种参数的设置。简要说来,full写入速度最慢,但保证数据是安全的,不受断电、系统崩溃等影响,而off可以加速数据库的一些操作,但如果系统崩溃或断电,则数据库可能会损毁。

SQLite3中,该选项的默认值就是full,如果我们再插入数据前将其改为off,则会提高效率。如果仅仅将SQLite当做一种临时数据库的话,完全没必要设置为full。在代码中,设置方法就是在打开数据库之后,直接插入以下语句:

sqlite3_exec(db,"PRAGMA synchronous = OFF; ",0,0,0);

极速:

虽然写同步设为off后,速度又有小幅提升,但是仍然较慢。我又一次踏上了寻找提高SQLite插入效率方法的道路上。终于,我发现,SQLite执行SQL语句的时候,有两种方式:一种是使用前文提到的函数sqlite3_exec(),该函数直接调用包含SQL语句的字符串;另一种方法就是“执行准备”(类似于存储过程)操作,即先将SQL语句编译好,然后再一步一步(或一行一行)地执行。如果采用前者的话,就算开起了事务,SQLite仍然要对循环中每一句SQL语句进行“词法分析”和“语法分析”,这对于同时插入大量数据的操作来说,简直就是浪费时间。因此,要进一步提高插入效率的话,就应该使用后者。

“执行准备”主要分为三大步骤:

  1. 调用函数sqlite3_prepare_v2(),并且声明一个指向sqlite3_stmt对象的指针,该函数对参数化的SQL语句zSql进行编译,将编译后的状态存入ppStmt中。
  2. 调用函数 sqlite3_step(),这个函数就是执行一步(本例中就是插入一行),如果函数返回的是SQLite_ROW则说明仍在继续执行,否则则说明已经执行完所有操作。
  3. 调用函数 sqlite3_finalize(),关闭语句。
  4. 样例代码如下:
    int _tmain(int argc, _TCHAR* argv[])
    {
    	const int nCount = 500000;
    	sqlite3* db;
    	sqlite3_open("testdb.db", &db);
    	sqlite3_exec(db, "PRAGMA synchronous = OFF; ", 0, 0, 0);
    	sqlite3_exec(db, "drop table if exists t1", 0, 0, 0);
    	sqlite3_exec(db, "create table t1(id integer,x integer,y integer ,weight real)", 0, 0, 0);
    	clock_t t1 = clock();
    
    	sqlite3_exec(db, "begin;", 0, 0, 0);
    	sqlite3_stmt *stmt;
    	const char* sql = "insert into t1 values(?,?,?,?)";
    	sqlite3_prepare_v2(db, sql, strlen(sql), &stmt, 0);
    
    	for (int i = 0; i<nCount; ++i)
    	{
    		sqlite3_reset(stmt);
    		sqlite3_bind_int(stmt, 1, i);//bind第一个数据
    		sqlite3_bind_int(stmt, 2, i * 2);//bind第二个数据
    		sqlite3_bind_int(stmt, 3, i / 2);//bind第三个数据
    		sqlite3_bind_double(stmt, 4, i*i);//bind第四个数据
    		sqlite3_step(stmt);
    	}
    	sqlite3_finalize(stmt);
    	sqlite3_exec(db, "commit;", 0, 0, 0);
    	clock_t t2 = clock();
    	sqlite3_close(db);
    	std::cout << "cost time: " << (t2 - t1) / 1000. << "s" << std::endl;
    
    	system("pause");
    	return 0;
    }


综上所述啊,SQLite插入数据效率最快的方式就是:事务+关闭写同步+执行准备(存储过程),如果对数据库安全性有要求的话,就开启写同步。